How to Create a Raised Bed Planting Layout | Beginner Gardener Part 5
Your raised bed planting layout doesn’t have to be stressful!
If you’ve been following along with the Beginner Gardener Series, you know it’s okay to view gardening “rules” as general guidelines. Gardening takes practice. We learn from our successes as well as our failures. You’ll never learn more about gardening than when you get your hands dirty!
You have to put the plants in the ground – – or in this case, the raised bed. Don’t worry if it’s not “right”. With a bit of sun and water, your garden will grow. As will your confidence. And next year will be even better!
I’m going to give you some ideas to create a raised bed planting layout. You don’t have to follow it exactly. These raised bed ideas are to help you picture how you want your raised bed to look, grow, and function. At the very least, it should give you an idea of how close to plant the 12 vegetables/herbs we talked about in part 2 and part 3 of our series.
Raised Bed Planting Layout Options
This first layout uses a fairly standard 6′ x 3′ raised bed like this galvanized raised bed option.

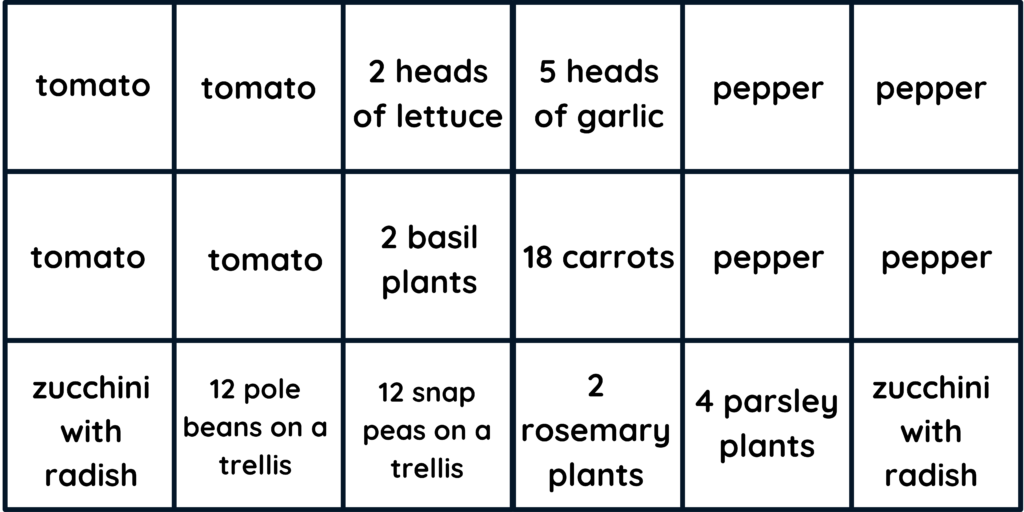
If you’re working with a 6×3 raised bed, you can use this planting layout to assist you when planning out your vegetable garden.
As you can see, the bed is sectioned off into squares. Each square represents 12″, or 1 square foot. You don’t have to follow the rules of “square foot gardening”. I don’t. What I do like is the basic idea of how close you can plant your crops when growing in raised beds.
If you have a zucchini plant tag, you may notice it requiring 3 feet of growing space. I find that staking your zucchini and growing it vertically allows for just 1 foot of space used in a raised bed. However, what’s even better is you can use the space under the zucchini (along the bed walls) to grow things like radish and carrots.
The next raised bed planting layout is based on a 5′ x 29″ bed like this one.
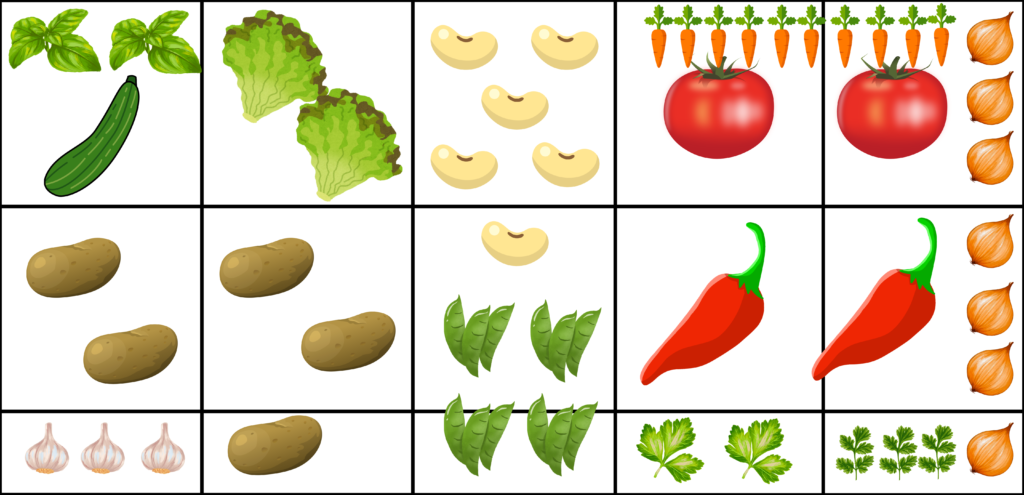
This bed is also laid out with a grid. The top 2 lines are each 12″, but the bottom line is only 5″ deep, as per the 29″ depth of the bed.
This smaller bed uses some different herbs with the addition of potatoes and garlic. I love this layout as it shows how much can be grown in such a small space.
Again, you don’t have to plant per square, but it certainly can help you get an idea of how closely to plant crops.
Planting Your Garden
The time has come to get your plants in the dirt of your brand new raised bed! You can do this!
Worst case scenario, your plant dies. We’ve all been there! That’s why you plant more than one!
I hope seeing the planting layout helps you envision your own raised bed. You can draw your own layout before planting, or place all your seedlings on the soil prior to planting. Heck, you can just wing it if that’s more your style!
Whatever you do, get the plants in the dirt! You’ll want to water right away, and then water nearly every day it doesn’t rain. How much water depends on your environment, heat, humidity, and wind. But if the top 1″ of soil is dry (put your finger in the dirt), you need to water.
Make sure to stake your plants and tie them in at planting time. I like to skip this and then I pay the price later!
If you missed any parts of the Beginner Gardener Series, you can find it here. Check back for part 6 in a few weeks when we cover plant maintenance.
Let me know if you have any questions as I’m happy to help! Thanks for stopping by and good luck!